I’d like to tell you about how SharePoint workflows can add another layer of enhancement to your BPA applications. By using the out of the box Three-state workflow, you can add a simple, automated approval process. Automating the creation and assignment of tasks is vital to reducing administrative tasks and optimizing the use of your employees’ time.
The SharePoint Foundation Three-state workflow, which is completely configurable from the front end of SharePoint, provides you with an easy configuration wizard to get started. As an example, Three-state workflow can contain your corporate documents library (which may house your internal standardized document templates and so forth), and then require approval from your different departments prior to publishing for use throughout the rest of your BPA application.
Let’s say that you have a Service Level Agreement (SLA) document that is required to be included with all quotes sent to customers. This SLA document is a template for your sales staff to modify with customer-centric data prior to dissemination, but updates to the template must go through approval prior to publishing new versions. This is where the Three-state workflow comes in, to ensure that the appropriate personnel take a look at the revisions to your template and give their sign-off on the changes. SharePoint automatically collects any information/comments they may have on the changes and records the necessary info for auditing activity and historical data for all actions taken during the workflow process.
Settings for the Three-state workflow are fairly straightforward and prompt you for some general information in the first step of configuration. You’ll be prompted to enter:
- Name of workflow
- Task List that the workflow should use to create associated tasking
- History List for workflow historical data tracking
- Start Options:
a. Allow workflow to be manually started
b. Start the workflow to approve publishing a major version of an item
c. Start workflow when new items are created/added
d. Start workflow when an item has been modified
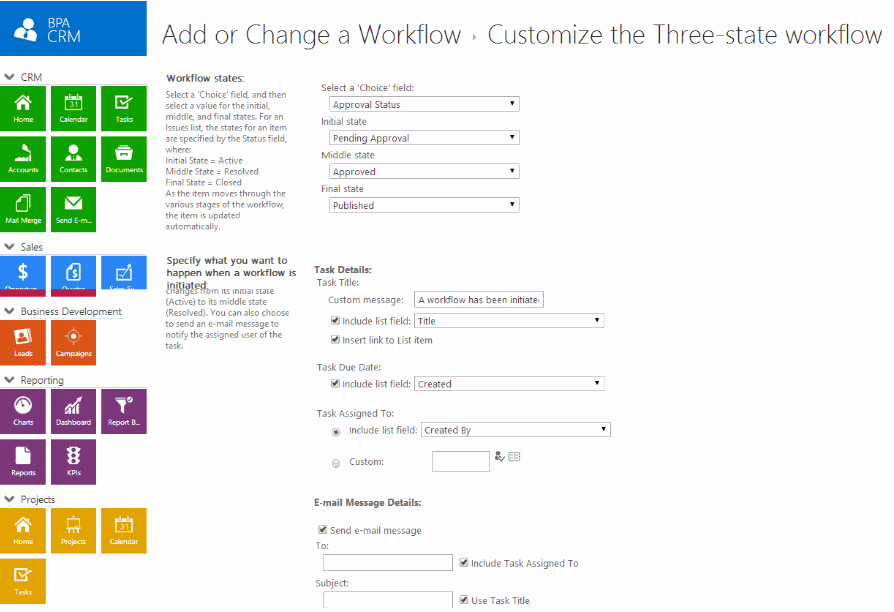
After providing this initial configuration, you’ll establish the details of your workflow. You’ll select three states for your workflow to use, e.g. Pending Approval, Approved, Published. The final configuration settings prompt you to choose what you want to happen when a workflow is initiated and when the workflow reaches its middle state. Details such as:
- Task Title
- Task Description
- Task Due Date
- Task Assigned To
- Email Messaging Details:
a. Who to send notification to
b. Subject of Email
c. Body Text
Automating the routing of documents, requiring approval of quotes sent to customers, or stepping through the lifecycle of a solution are all great examples of how the simple Three-state workflow engine can provide efficiency and power to your BPA Applications. The potential of your BPA application suite, extended by using many of the great features inherent in Microsoft SharePoint, are limitless. Use your SharePoint knowledge to build solutions like out-of-the-box workflows and custom designer workflows, and you’ll see that by going with BPA applications you’ve not only acquired a great tool, but also a framework that you can extend to meet your specific needs.
Sign up to receive our blog via email, and never miss a Tip From Townsend!